
This article covers:
- Why a custom template needs a one-time setup step before Send to EMR works
- Saving your template (required before setup)
- Setting up Send to EMR for your template
- Setting up more than one heading for the same Med Access field
- What happens if a EMR field is left out of the setup
- Saving your setup
- What happens to your setup when you save a new template version
Why this setup step exists
Med Access only receives notes into three fields, based on the SOAP format: Subjective, Objective, Assessment, Plan. A custom template can have as many headings as you like, so before Send to EMR can work for it, Tali needs to know which of those three fields each heading belongs under. Once that's set up, sending a note built from that template works exactly like it does for SOAP, one click.
Saving your template first
The EMR Fields tab, where you do this setup , is locked until your template has been saved at least once. This is intentional: setting up Send to EMR on a template that's still being drafted would mean redoing the work every time you make an edit.
To get there from a new template:
- Write or paste your template in the Template tab.
- Click Sync preview to generate a note preview from your template.
- Once the template and preview are aligned, click Save.
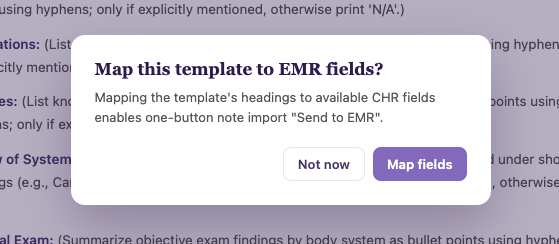
As soon as your template is saved, a prompt appears asking if you'd like to set up Send to EMR now. You can do this right away or choose Not now and come back to the EMR Fields tab later.
Setting up Send to EMR for your template
- Open your saved template and go to the EMR Fields tab.
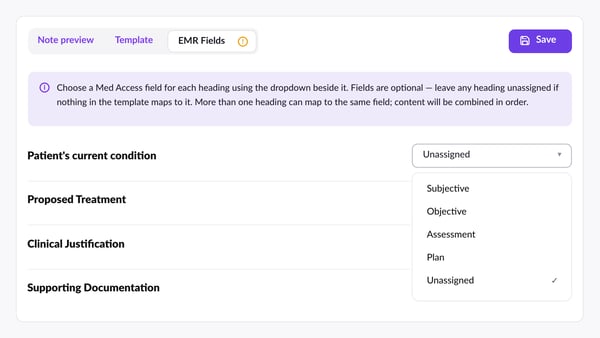
- Each heading in your template is listed with a field selector beside it. A freshly saved template starts with every heading Unassigned.
- Click the field selector next to a heading.
- Choose Subjective, Objective, Assessment, or Plan from the dropdown.
Changing your mind later? Click the same selector at any time and pick a different field, or choose Unassigned to clear it.
Setting up more than one heading for the same field
Med Access' three fields are broader than most custom templates' headings, so it's normal for several headings to belong under one field. For example, Past Medical History, Medications, and Allergies might all reasonably belong under Subjective.
There's no limit to how many headings can share a field. When a note is sent to Med Access, all the content under a given field is combined, in the order the headings appear in your template.
Leaving a Med Access field out
You don't need to use all three Med Access fields. If nothing in your template belongs under Assessment, for example, leave every heading unassigned to it. Send to EMR will still work, that field is simply left empty on the note, rather than blocking you from finishing setup.
Saving your setup
Assigning fields to headings doesn't save your setup by itself, you still need to click Save in the EMR Fields tab before Send to EMR is actually enabled for this template.
The link icon next to EMR Fields in the tab bar tells you where things stand:
- An amber alert icon means that no mapping has been saved for this template.
- A green checkmark icon means a mapping has been saved and Send to EMR can be used for this template. As long as there has been a version of the the EMR field assignment saves, the tab's icon will remain a green checkmark.
The Save button itself stays disabled until there's something new to save, so you can't accidentally re-save an unchanged setup.


Saving a new template version
When you save a new version of the template you will be prompted to review the mapping to see if the new version required any changes to the EMR field assignment. As long as there has been a version of the the EMR field assignment saved, the tab's icon will remain a green checkmark.
This is deliberate: it's a safety check to make sure Send to EMR doesn't fire on outdated field assignments after the template itself has changed.
You can review how to send notes to Med Access with the "Send to EMR" one click button here