
This article covers what each action does and when it shows up. It's written for clinicians and clinic staff (MOAs). The exact buttons you see depend on your role, the appointment's state, and which features your clinic has enabled.
Schedule views
Use the Display options control to switch between three views. Tali remembers your choice:
- List — appointments as rows, grouped by day.
- Day — one day's calendar grid.
- Week — the same grid across seven days.
The Day and Week grids are part of the appointments schedule enhancements. If your clinic doesn't have them enabled, you'll see only the List view — where all the same actions are available as buttons on each row.
Clicking an appointment
In the Day / Week grid, clicking a card is a shortcut to the most likely next step:
- Completed encounter with a note → opens the note.
- Finished, cancelled, or errored encounter without a note → nothing happens (read-only record).
- Anything else → opens the Edit appointment dialog.
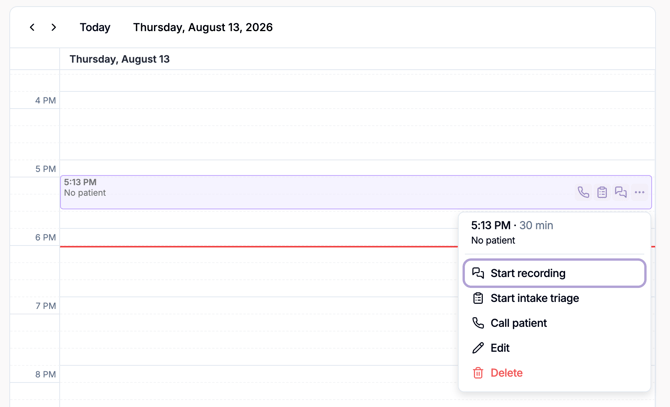
You can also drag a card to reschedule it, or drag its top/bottom edge to change its duration. Both open the Edit dialog pre-filled so you can confirm — nothing saves automatically. Appointments with a finished encounter, or synced from an EMR (for example Accuro), are read-only and can't be dragged or resized. Click an empty slot to create a new appointment.
In the List view, each row shows its actions directly in the Actions column, so you don't need to click the row first. Clicking the row opens the completed encounter, when one exists and you have permission to open it.
The actions
| Action | What it does | When it appears |
|---|---|---|
| Start recording | Starts the ambient encounter and takes you into the recording screen. | Before an encounter exists, for users who can start encounters. Hidden on the MOA clinic worklist. |
| View encounter | Opens the note for an encounter already created from the appointment. | After a completed encounter with a linked note exists. Same destination as clicking the appointment. |
| Call patient | Starts a patient phone call and opens the call screen. | Before an encounter exists, when patient calling is enabled for your clinic. |
| Start intake triage | Opens the intake triage flow to capture reason for visit and any red flags. | Before an encounter exists, when MOA triage is enabled for your clinic. |
| Edit | Change date and start time, duration, patient, provider, additional context, and modality. | Any appointment without a finished encounter. |
| Delete | Removes the appointment after a confirmation prompt. If an encounter was created, deleting also permanently deletes that encounter — this can't be undone. | Appointments you own. Remains available even after the encounter is finished. |
Why an action might be missing or greyed out
- Finished, cancelled, or errored encounter — the appointment is read-only; only Delete (and View encounter, if a note exists) remain.
- You're on the MOA clinic worklist — recording and calling are hidden (they're clinical actions); scheduling, editing, and triage stay available.
- Feature not enabled — patient calling and intake triage only appear when turned on for your clinic.
- An action is already in progress — buttons are briefly disabled to prevent duplicates.
- Hosted EMR page — in some embedded EMR contexts (for example a frequently-refreshing Oscar page), recording is disabled with a tooltip explaining why.